Keeping your crafting supplies organized can completely transform your creative experience. Whether you work with yarn, fabric, or a combination of both, an efficient system saves time, reduces stress, and makes your workspace more inspiring. Many crafters struggle with clutter simply because they accumulate materials faster than they can store them. But with thoughtful planning, even small spaces can become beautifully functional. This guide will teach you how to organize your yarn, fabric, and tools in a practical and visually pleasing way.
Why Organization Matters for Creativity
A well-organized crafting area helps you stay motivated. When materials are easy to find, you spend less time searching and more time creating. Proper storage also protects your supplies from damage, fading, pests, or moisture. Additionally, seeing your tools clearly—sorted by color, size, or texture—can spark new project ideas. Organization is not about perfection; it is about creating an environment where inspiration flows naturally.
Assessing Your Current Inventory
Before reorganizing, take time to assess what you already own. Spread out your yarn, fabric, and tools so you can evaluate the quantity and condition of each item. Ask yourself:
Do I use this type of yarn often?
Is this fabric still something I love?
Are there duplicate tools I no longer need?
Sorting helps you understand what requires storage and what you may want to donate or repurpose. This step makes the organizing process much easier and more meaningful.
Organizing Yarn by Weight
Yarn weight determines how thick or thin the yarn is and affects the look of your projects. Organizing by weight makes it easier to choose the right yarn for each pattern. Use labeled bins or shelves to separate:
Lace weight
Sport weight
DK weight
Worsted weight
Bulky and super bulky
If space is limited, combine lighter weights together and heavier weights together. Just ensure each group is clearly marked.
Sorting Yarn by Color
Many crocheters and knitters prefer organizing yarn by color because it is visually inspiring. Color organization can spark creativity and help you plan color palettes. You can group yarn by:
Warm colors (reds, oranges, yellows)
Cool colors (blues, greens, purples)
Neutrals (white, beige, gray, black)
Rainbow gradients
Choose a method that matches your style and makes sense for your projects.
Using Clear Storage Bins
Clear plastic bins are one of the best ways to store yarn because they protect fibers from dust while keeping everything visible. Label each bin by weight, color, fiber type, or project. Stackable bins maximize vertical space, making them ideal for small craft rooms or closets. If you want a more decorative look, use woven baskets and attach labels for easy identification.
Displaying Yarn on Open Shelves
If you love seeing your yarn, open shelving is both functional and beautiful. Shelves allow you to display yarn like a colorful gallery. Just make sure your shelves are away from direct sunlight to prevent fading. Arrange skeins horizontally or in cubes for a tidy, organized appearance. Open shelves are perfect if you use your yarn frequently.
Creating Yarn Storage for Small Spaces
For crafters with limited room, compact solutions are essential. Try:
Over-the-door shoe organizers
Under-bed storage bins
Hanging closet shelves
Stackable rolling carts
These solutions keep yarn accessible without taking up valuable space. Rolling carts are especially helpful because you can move your supplies wherever you are working.
Organizing Fabric by Size
Fabric can be tricky to store because it comes in many different cuts. To keep everything tidy, separate fabric by size:
Fat quarters
Half-yard cuts
Full yard cuts
Scraps
Fold each piece neatly and store them in drawers, baskets, or clear boxes. Vertical folding saves space and makes it easier to see each fabric at a glance.
Sorting Fabric by Type
Different fabrics serve different purposes. Cotton quilting fabric, flannel, linen, and specialty prints should each have designated areas. Keeping them separate ensures you can quickly find the right material when starting a new quilt or sewing project.
Using Comic Boards for Fabric Folding
Comic book boards are a popular tool among quilters for folding fabric into mini “bolts.” Wrap your fabric around the board, secure it with a pin, and stand it upright in bins or shelves. This method keeps your fabric wrinkle-free and beautifully organized, similar to a fabric store display.
Storing Fabric Scraps
Scraps are valuable for appliqué, patchwork, and small crochet-fabric hybrid projects. Organize scraps by color or size in small bins or drawers. Clear jars are another attractive option, allowing you to store scraps visibly while adding a decorative touch to your workspace.
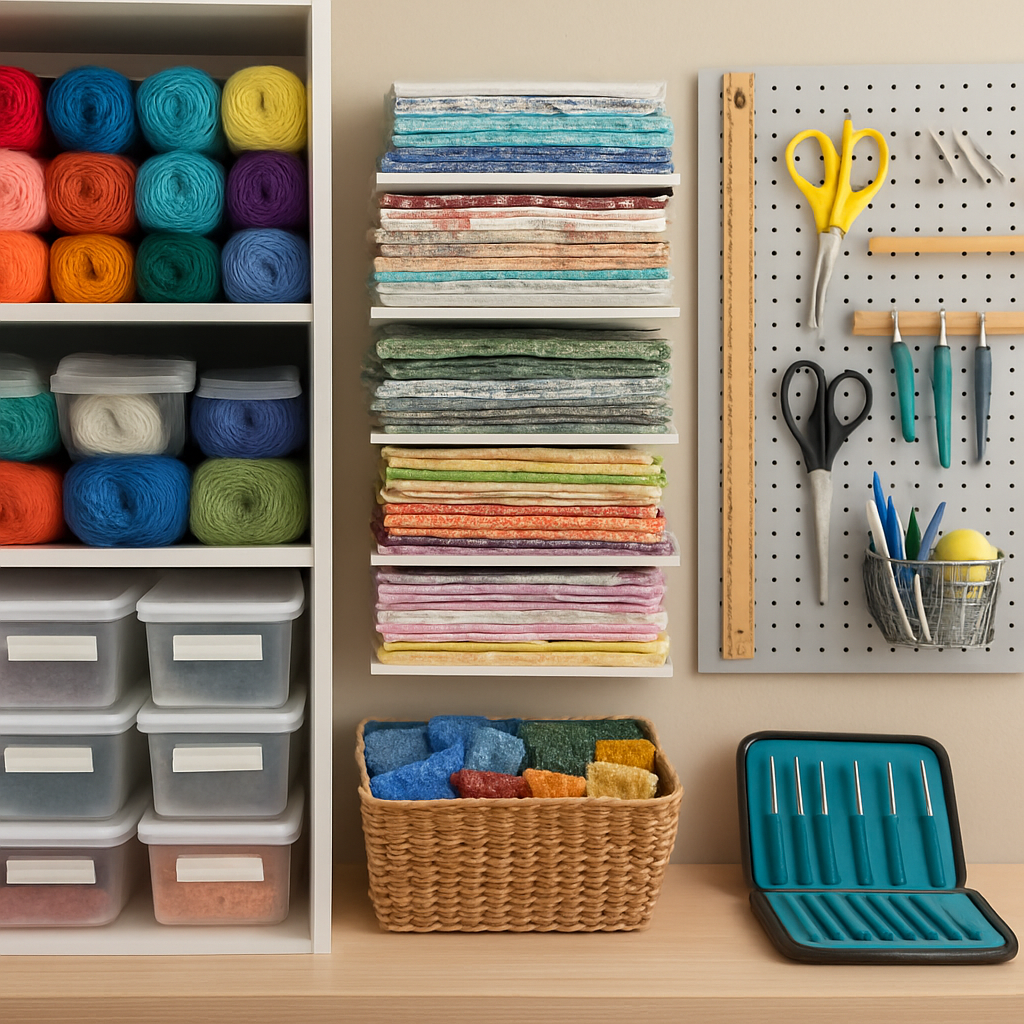
Keeping Tools Organized
Crochet hooks, knitting needles, scissors, stitch markers, rulers, and cutting tools all require dedicated storage. Consider these ideas:
Use a zippered pouch or hook case for crochet tools.
Store scissors and rotary cutters in a magnetic strip or cup.
Keep rulers in a wall rack to prevent cracking.
Use a pegboard to hang tools within easy reach.
Tool organization ensures you know exactly where everything is, reducing frustration and lost materials.
Creating a Portable Tool Kit
A portable kit is helpful if you move between rooms or take your projects on the go. Include essentials like:
Hooks or needles
Small scissors
Stitch markers
Measuring tape
Yarn needles
A portable kit keeps everything within reach, allowing you to work anywhere comfortably.
Setting Up a Cutting and Measuring Area
If you sew or quilt, a dedicated cutting space is essential. Use:
A sturdy table
A large cutting mat
Rotary cutters
Acrylic rulers
Organizing your cutting tools in one place saves time and prevents accidents. Keep the surface clear of clutter so you can lay out fabric easily.
Creating a Project Storage System
Most crafters have multiple projects in progress. Create separate bins or bags for each project. Label them with the project name, hook size, and yarn type. This prevents confusion and makes it easy to pick up where you left off.
Wall Storage and Display Ideas
Wall storage helps keep your workspace open and uncluttered. Consider:
Pegboards
Floating shelves
Hanging baskets
Magnetic strips
These methods offer a combination of function and decoration. A well-designed craft wall can become a beautiful focal point in your room.
Maintaining Your Organization System
Once your space is organized, maintaining it becomes much easier. Return tools to their designated spots after each use. Fold fabric neatly when adding new pieces. Place leftover yarn in the correct bin. The more consistent you are, the more enjoyable your creative time will become.
Making Your Creative Space Inspiring
Your craft room should make you feel happy and motivated. Add touches like:
A small plant
Fairy lights
Your favorite finished projects
A cozy chair
Soft music
When your creative environment feels inviting, you will look forward to every crafting session.
Final Thoughts
Organizing your yarn, fabric, and tools is one of the most effective ways to improve your crafting experience. A well-structured system helps you work faster, stay inspired, and enjoy every moment of creating. Whether you have an entire room or a small corner, thoughtful organization makes crafting more enjoyable and efficient. With a clean and orderly workspace, your creativity can flourish naturally.