Crochet charts are powerful tools that allow you to visualize stitches, understand pattern flow, and follow instructions more easily. Yet for many beginners, crochet charts can look intimidating at first—full of symbols, arrows, and diagrams that seem confusing if you’ve only worked with written patterns. The good news is that once you learn how to read crochet charts, they become an incredibly helpful resource. Charts provide clarity, accuracy, and a visual roadmap for your project. This guide will teach you how to understand, interpret, and use crochet charts confidently, even if you’ve never read one before.
What Is a Crochet Chart?
A crochet chart—also known as a diagram—is a visual representation of a crochet pattern using standardized symbols instead of written instructions. Each symbol represents a specific stitch. By looking at the chart, you can see how the stitches connect and build upon each other. Charts are especially useful for lace patterns, motifs, granny squares, and projects that involve working in the round. Unlike written instructions, which must be read line by line, charts let you see the entire pattern at once.
Why Crochet Charts Are Useful
Crochet charts help you understand patterns more efficiently because they show stitch placement clearly. They eliminate confusion caused by text errors or long lines of written instructions. Charts also make it easier to visualize the finished shape and structure of your work. If you are a visual learner, charts can help you understand how stitches fit together and how each row progresses. Additionally, charts make it easier to identify mistakes, since you can compare your work directly to the diagram and adjust before continuing.
Understanding Basic Crochet Symbols
Each stitch has a corresponding symbol used in crochet charts. While symbols may vary slightly between regions, most charts use standardized icons that are easy to recognize. The most common symbols include:
A small oval or dashed line representing a chain stitch
A “+” or “x” representing a single crochet
A “T” or vertical line with a bar for a half double crochet
A vertical line with a single slash through it for a double crochet
A vertical line with two slashes for a treble crochet
A dot for a slip stitch
Other symbols exist for increases, decreases, clusters, and special stitches, but these basic symbols form the foundation. Once you memorize these, reading charts becomes much easier.
Charts Worked in Rows
When a crochet chart is worked in rows, it usually reads from bottom to top. The first row begins at the bottom of the diagram. Odd-numbered rows are worked from right to left, while even-numbered rows are worked from left to right. Arrows or numbers often indicate the direction to follow. Written instructions may accompany the chart, but the diagram itself shows the placement of each stitch. When you understand how to follow the direction of rows, you can decode most charted patterns regardless of language.
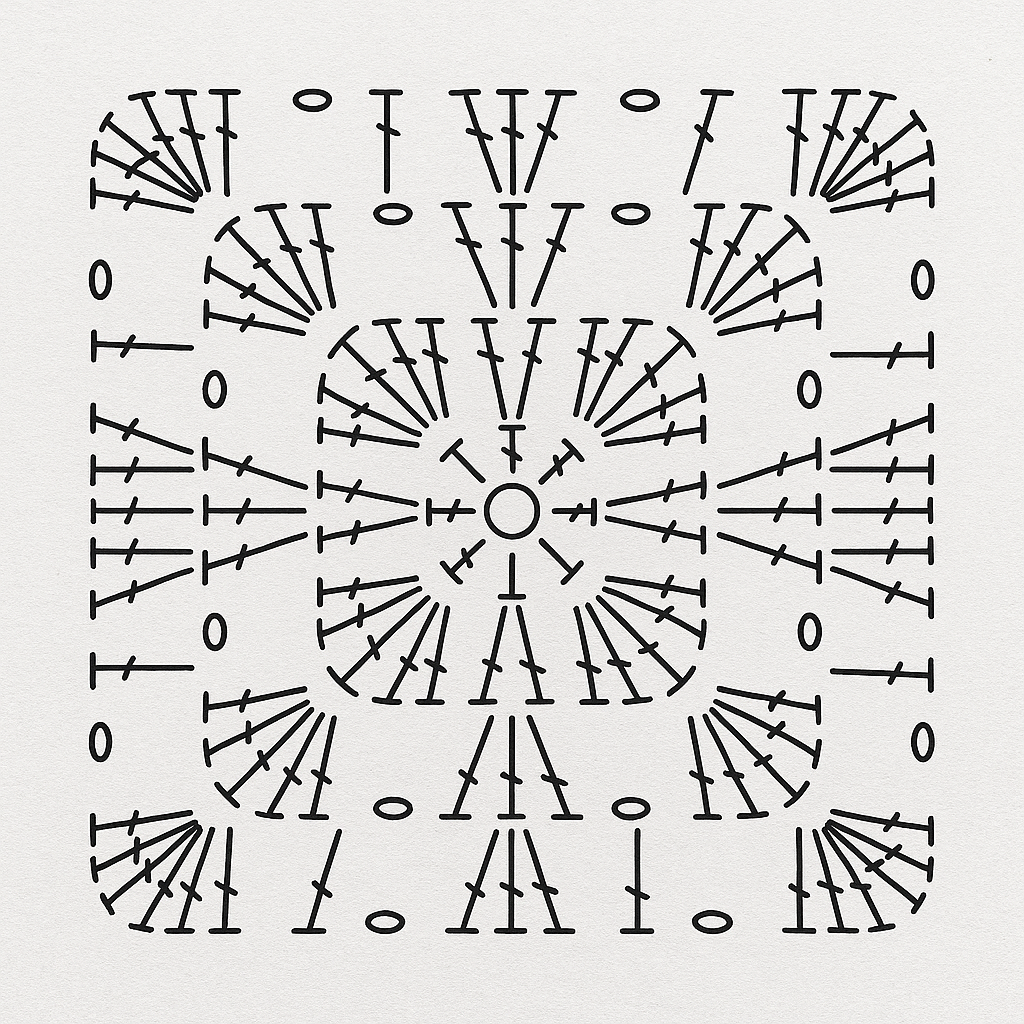
Charts Worked in the Round
Crochet charts worked in the round begin at the center and move outward. These charts are common for motifs and granny squares. The starting point is typically marked with a small circle or an arrow. Each round is drawn around the previous one. You follow the chart in a clockwise or counterclockwise direction depending on the pattern, though most crochet charts move counterclockwise. Because you work continuously in the same direction, round charts are often simpler to follow visually than row charts.
Understanding Repeats in Charts
Repeats are marked in crochet charts using brackets, boxes, or colored outlines. These indicate the sequence of stitches that should be repeated across the row or round. Written patterns often use terms such as “repeat from * to *,” but in charts, repeats are shown visually, making them easier to understand. You simply follow the section inside the repeat symbol as many times as required. Repeats help simplify complex patterns by breaking them into manageable segments.
Special Symbols and Stitch Combinations
In addition to basic stitches, crochet charts may include special symbols for increases, decreases, shells, clusters, puff stitches, and other decorative stitches. These symbols may look more complex, but they are usually explained in a legend or key included with the pattern. If you’re uncertain about a specific symbol, refer to the chart’s legend. Understanding these special symbols opens up a wide range of advanced patterns that rely heavily on charted instructions.
Connecting Stitches in Charts
One of the greatest advantages of crochet charts is that they show exactly where to place each stitch. Stitches are connected visually through their symbols, showing how to work into previous stitches or chain spaces. For example, in a granny square chart, groups of double crochets are clearly shown inserted into chain spaces from the previous round. This visual clarity helps beginners understand stitch placement better than written instructions alone. When practicing with charts, pay close attention to how symbols connect and align.
Counting Stitches in Charts
Counting stitches accurately is essential for following crochet charts. Because charts show every stitch symbol, you can count them easily before starting a row or round. This helps prevent mistakes early on. If the chart includes repeats, count stitches within each repeat as well. Counting as you work ensures that your project stays on track and matches the charted design.
Using Chart Legends
Every crochet chart should include a legend or key that explains the symbols used in the pattern. Legends help you decode unfamiliar symbols and understand how special stitches are constructed. Always review the legend before starting a new chart. Some patterns include symbols unique to that designer, so the legend ensures you interpret everything correctly. Keeping the legend nearby as you work can help avoid confusion and mistakes.
Practicing With Simple Charts
The best way to learn how to read crochet charts is through practice. Start with simple charts such as granny squares, basic lace patterns, or small motifs. These charts help you become familiar with reading direction, interpreting symbols, and understanding stitch placement. As you gain confidence, try more complex charts with increases, decreases, and shaping. With practice, chart reading becomes second nature.
Switching Between Written and Charted Instructions
Many patterns include both written and chart instructions. Switching between the two can improve your understanding of the pattern. If you get stuck on a chart, refer to the written instructions for clarification. Conversely, if written instructions seem confusing, study the chart for a clearer visual interpretation. Learning to use both methods helps you become a more versatile crocheter and expands the range of patterns you can follow.
Identifying Mistakes Using Charts
One of the biggest benefits of crochet charts is that they help you identify mistakes quickly. If your work doesn’t look like the chart, you can immediately spot where the stitch count or placement went wrong. This reduces the amount of unraveling and frustration. Comparing your project to the chart frequently will help ensure accuracy and keep your work aligned with the pattern.
Gaining Confidence Through Chart Reading
As you grow more comfortable with charts, you’ll gain confidence in your crochet skills. Chart reading allows you to explore more complex patterns, try new techniques, and take on more ambitious projects. Understanding charts also makes it easier to modify patterns or design your own creations. With practice and patience, crochet charts will become one of the most valuable tools in your crafting journey.
Artigo 12 finalizado!