Patchwork is one of the most beloved techniques in quilting, bringing together small pieces of fabric to create beautiful, cohesive designs. For centuries, patchwork has been a way to use leftover scraps, express creativity, and tell stories through fabric. Whether you dream of making a full quilt, a pillow cover, or a small decorative piece, patchwork is the perfect place to begin your quilting journey. This guide will help complete beginners understand the fundamentals of patchwork, choose fabrics, plan designs, sew accurate pieces, and enjoy the creative process from start to finish.
What Is Patchwork?
Patchwork is the process of stitching together small pieces of fabric—called patches—to form a larger design known as a quilt top. These patches can be squares, triangles, rectangles, or more complex shapes, depending on the pattern you choose. The beauty of patchwork lies in how simple pieces combine to create visually striking designs. Some patchwork patterns feature repeating blocks, while others use improvisational layouts. For beginners, patchwork offers a structured yet flexible way to build skills, practice accuracy, and explore color and shape.
Essential Tools for Patchwork
Before you begin, gathering the right tools will make your patchwork experience smoother and more enjoyable. You will need a rotary cutter, a self-healing cutting mat, acrylic rulers, pins or clips, thread, an iron, and a sewing machine. While patchwork can be sewn by hand, most beginners find machine piecing faster and more consistent. Choose high-quality quilting cotton to ensure your pieces press neatly and sew easily. Having sharp tools and well-cut fabric makes a big difference in the accuracy and appearance of your finished patchwork.
Choosing Fabrics for Your Patchwork
Fabric selection is one of the most exciting steps in patchwork. Begin by choosing colors and prints that you love. If you’re unsure where to start, look for pre-coordinated fabric collections, fat quarter bundles, or charm packs. These sets are designed to work well together and take the guesswork out of color matching. When choosing fabrics yourself, consider sticking to a simple palette of two to five colors. Mixing solids with prints adds variety without overwhelming the design. Pay attention to value—the lightness or darkness of a color—as it plays a vital role in creating contrast and definition within your patchwork.
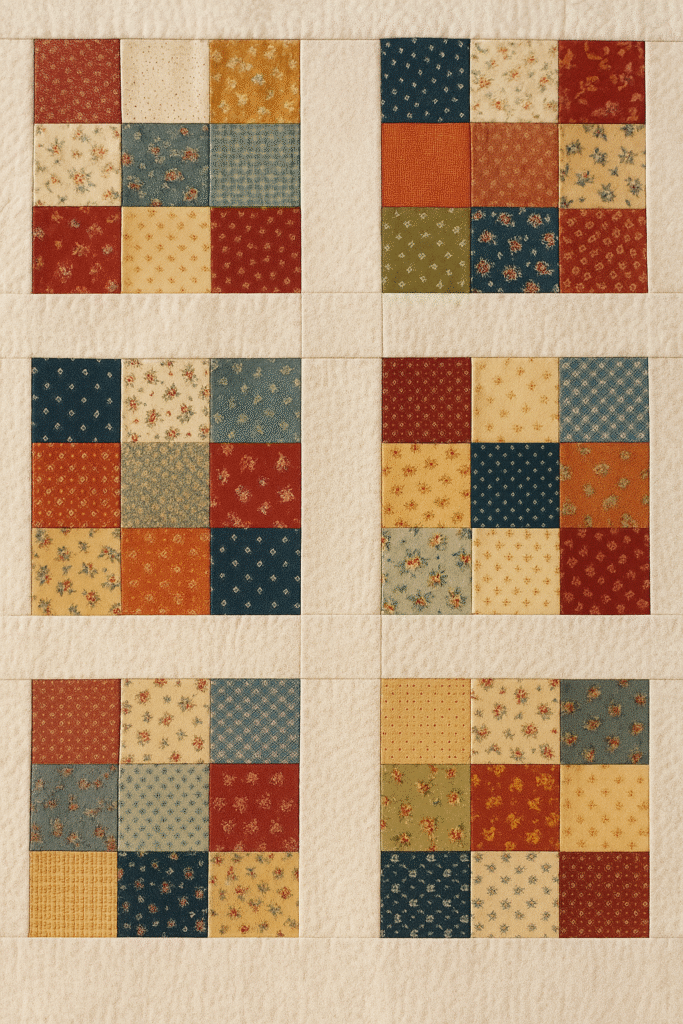
Understanding Patchwork Blocks
Patchwork projects often use blocks—smaller sections that are sewn together to form the full quilt top. Beginner-friendly blocks include the Four Patch, Nine Patch, Rail Fence, and Log Cabin. These blocks use basic shapes and repeating units that are easy to sew and organize. Each block is typically made from squares or strips, making it perfect for those just learning to cut and piece fabric. As you gain experience, you can explore more detailed blocks such as Pinwheel, Churn Dash, or star variations.
Planning Your Patchwork Layout
Before sewing, it’s helpful to visualize your layout. You can sketch your design on graph paper or use digital quilt design tools. Alternatively, you can simply lay out your fabric pieces on a flat surface and arrange them until you are satisfied with the design. Planning helps you achieve balance with colors and prints, ensuring the final result looks cohesive. Try mixing large and small prints, alternating colors, or creating patterns with repeating blocks. Don’t be afraid to experiment—patchwork is all about exploration.
Cutting Fabric Accurately
Accurate cutting is essential for patchwork success. Begin by pressing your fabrics to remove wrinkles. Use an acrylic ruler and rotary cutter to cut precise pieces according to your chosen pattern. Measure twice and cut once to avoid mistakes. Keeping your fabric pieces consistent in size ensures they will fit together neatly when sewing. Even small inaccuracies can cause blocks to become uneven, so take your time during this step.
Sewing Patchwork Pieces Together
When sewing patchwork, accuracy and consistency are more important than speed. Use a quarter-inch seam allowance—the standard for quilting—to ensure your pieces align correctly. Most sewing machines offer a quarter-inch presser foot for greater precision. Sew pieces right side together, keeping your fabric edges aligned. After sewing each seam, press the fabric with an iron to keep it flat and prevent distortion. Pressing seams to one side or open is a matter of preference, but consistency is key.
Chain Piecing: A Beginner’s Best Friend
Chain piecing is a technique that allows you to sew multiple fabric pairs quickly and efficiently. Instead of cutting threads between each pair, you feed one set of pieces into the machine right after another, creating a continuous chain. This method saves time, reduces thread waste, and helps maintain consistent sewing. Chain piecing is especially useful when making patchwork blocks with repeating units, such as the Nine Patch or Rail Fence.
Pressing Seams for Best Results
Pressing is one of the most overlooked yet important aspects of patchwork. After sewing each seam, press it with an iron to keep your block flat. Pressing helps keep seams accurate and reduces bulk. You can press seams to the side, which strengthens the seam and helps seams nest together when joining blocks. Alternatively, pressing seams open distributes bulk evenly and creates a smoother finish. Choose the method that feels most comfortable and consistent for your project.
Assembling Blocks into Rows
Once your blocks are finished, the next step is assembling them into rows or sections. Lay out your blocks according to your plan. Sew them together one seam at a time, pressing between each step. Use pins or clips to match seams and ensure your blocks line up neatly. Taking your time during assembly ensures your final quilt top looks polished and well-constructed.
Adding Borders to Your Patchwork
Borders frame your patchwork and give structure to the quilt top. They can be simple strips of fabric or pieced designs that complement your blocks. Borders help square the quilt and add visual balance. When measuring borders, avoid cutting them based solely on block measurements. Instead, measure the center of your quilt and cut borders to match, which helps keep the quilt straight and prevents wavy edges.
Common Patchwork Mistakes and How to Avoid Them
Beginners often encounter a few common issues, such as mismatched seams, uneven blocks, or fabric stretching. These issues can usually be prevented by slowing down, cutting accurately, using proper seam allowances, and pressing carefully. If a block ends up slightly too big or too small, trimming or gently adjusting seams can often correct the problem. Remember, quilting is a learning process, and small imperfections are part of the charm.
Starting Small: Beginner-Friendly Patchwork Projects
You don’t need to make a full quilt right away. Small patchwork projects are great for learning techniques without feeling overwhelmed. Consider creating coasters, placemats, pillow covers, or mini quilts. These projects use the same techniques as larger quilts but allow you to practice and see results quickly. As your skills grow, you can move on to lap quilts, wall hangings, and bed quilts with confidence.
Enjoying the Patchwork Journey
Patchwork is a creative and rewarding craft that invites personal expression and experimentation. Whether you prefer organized patterns or improvisational designs, patchwork gives you endless opportunities to explore color, shape, and texture. Over time, you’ll develop your own style and discover the joy of transforming simple pieces of fabric into something meaningful. The key is to be patient, enjoy the process, and keep practicing.